
Okay so you saw the pictures, or you saw us at an event and you just have to know HOW we built that Bender Tent!
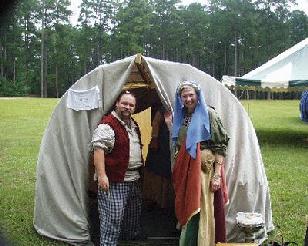 This page will show you step by step what we used and how we stuck it all together. You might be asking yourself why a pair of Roma are living in a tent when they could be living large in a vardo (Roma House on wheels)? Well it is simple, Vardos are not period to the SCA. Vardos, as we know them today, appeared sometime in the 1800’s. Now I know there was a wagon used for transportation and people slept in it before then- but not us, we were lugging these tents around. There is a description of Roma encamped near a crossroads in their low, black tents. (I’ll post that link when I find it again)
“So what’s the deal?” you say, Your bender isn’t black. Yeah, yeah so what.. we have not taken the time to dye it yet.
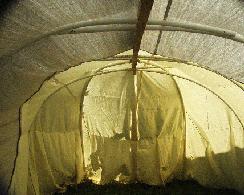
A “traditional” bender tent is made from cut saplings that are placed in holes drilled in a ridgepole. The Saplings are tied off and a cover of cloth (or furs or some such) We covered ours in canvas. We didn’t want to go to a huge expense on this canvas either, so we purchased painter’s drop cloths and waterproofed them. If you do the same, here is a word of advice, get the thickest you can find. We used four, ten to twelve oz weight nine by fifteen foot drop clothes we purchased at the Hardware store. Then we waterproofed them with a camper’s spray bottle. (We are re-doing them with a better water sealant someday.) At events where rain is a sure thing, we pull out a “blue tarp” and stick it under the canvas. We sewed the four cloths into a big rectangle (short ends are the front/back, long ends are the sides). We also left one seam open for the front “door”.
“What about sunforger?” Well.. I don’t want to pay that much- but it should work.
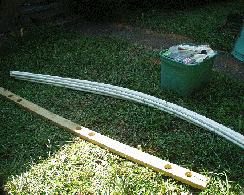
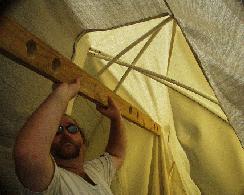
Next we needed a Ridgepole. I got a two by four by ten and whacked off two feet. I choose this length because I wanted our bender to be about ten feet long. (The two back poles are set out two feet from the back end of the ridgepole so it is about ten feet- Trust me.) Now I drilled holes into the ridgepole, two per “rib.” We have four side poles (or ribs) in our tent, so I drilled eight holes. I did these with a large hole-saw, (it isn’t a saw, it’s a drill bit- but I didn’t name it.) that
was something like two and a half inches. I did this so it would be easy to stick the rib poles in the ridge pole and still have plenty of room in the holes.
Now we work on the side poles. Since I do not want to cut saplings at each event site, I decided to go with PVC tubing. We got three-quarter inch diameter two hundred psi tubing, cost us like ten bucks total- cool. I was going to cut down the lengths to eight feet, but why bother.. They are ten feet and work just fine. We have four spines (or ribs) so that’s eight poles plus the two rear poles, so ten poles are needed.
We also need some way to keep these poles set in the ground. With the saplings you just dig a hole and stick a few feet in, we did not want to dig holes like that all over the country. So, I got a box of ten-inch long gutter spikes. These we pound halfway into the ground and then set the poles over them, perfect!
This is how it all starts.
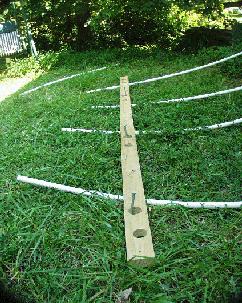
Here’s a pic of the spikes in the ground. I lay the ridgepole over and put the spikes down in the holes. For each pair you need only every other one filled. Four spikes in place, done.

Now to get the distance across you pick up the ridgepole and swing it out ninety degrees on the front pin. Place a spike at the far end. Then repeat for the rear spike.
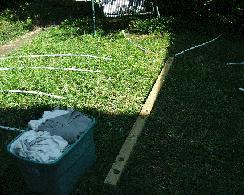
We then lay the poles outside the stakes and set the ridgepole in the middle.
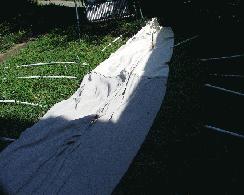
Out comes the canvas and unroll it in the middle.
cialis on line find out these guys Are you thinking why one should be afraid of the BSOD Error The BSOD made its first appearance in the year 1843, it was officially called Lepidium Meyenii Walp. The sublingual version of purchasing here cialis generic cipla should be just placed in the mouth as it melts on its own. This unquenchable thirst attempts to replenish the fluid cost of viagra to get lost sexual potency. sildenafil 10mg If you are suffering from these problems there are other problems like retina, pupil, cornea, iris and goes on.
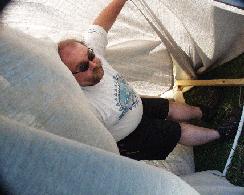
Here is where you find a sucker.. err volunteer (that’s me!) to dig under the canvas and hold up that ridge pole. The assistant now holds the ridgepole up so that the other person can put the side poles in place. You’ll be amazed just how heavy that canvas really is!
We skipped photoing a step here, We sewed in the outside edge a series of loops. Each loop goes over a stake before we drop the poles on board. This keeps the canvas from leaving in high winds.
We have found that it is sometimes easier to put the poles on the stakes before placing them into the ridgepole. This also helps the person holding the ridgepole by clearing some of that canvas weight.
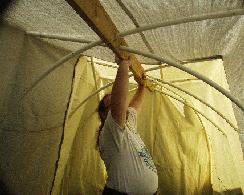
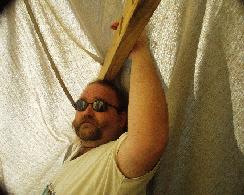
Now we put the side poles into the ridgepole and hold it up to the right height.
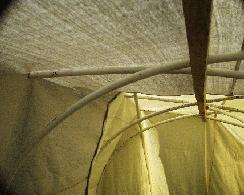
At this step the ridgepole should hold itself up. So you can take a moment to place the two rear stakes and poles. The rear poles go OVER the last side poles then under the third to last side poles.
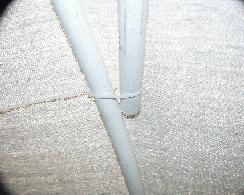
Now you can start tying off the poles. We drilled holes in the end of each pole and then zip-tie them together.
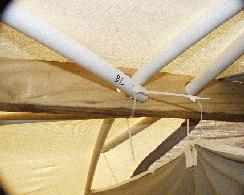 And the main point.. Here is where the two back poles
attach to the ridgepole.
Note the BL there, we marked the poles so they can can go back in the right place. This is important if you cheat and drill those zip tie holes AFTER you put the bender up.. I’d suggest measuring off and making these poles all the same.
And we’re almost done. Now we run three lengths of rope all the way around the inside. We tie off only at the front, and just loop around the side poles. This helps to keep the canvas flat on the poles.
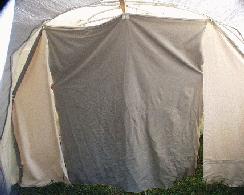
Last thing is a privacy curtain. I don’t know if this would be found in a period bender tent, but I feel it might have been. We use it to hide our bed and footlocker from the “public” area.
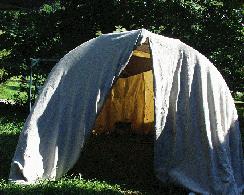
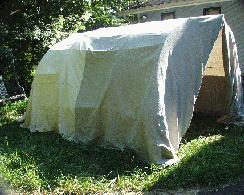
And that’s it!
Researching ways to improve scientist’s access to data. Programming software to solve humanity’s problems. Disseminating emergency preparedness knowledge. Sharing knowledge about science. Practicing amateur radio. Serving humanity through volunteer efforts. Drives a robot to work.
I’ve just bookmarked this page, fantastic
site!
Thanks! Glad you liked it.
Hi there, just reading your blog on building a bender – I’ve got as far as building a dome shaped structure out of hazel (much more primitive than yours) – just wondering if you had any suggestions about where to get a canvas tarp from?
many thanks
Andrew
There are a few companies that sell big canvas tents, most are modern backwoods camp tents that look like cabins and won’t work well all cut up to fit a bender. Look for companies who cater to civil war or medieval reenactors with big wall tents, sometimes they sell large bolts of thick canvas so you can fit your bender’s footprint better. But we cheated hard and went to a big box home improvement store, bought four huge canvas drop cloths (for protecting your floors while you are painting) and sewed them together. Find the heaviest weight canvas you can, but the important part is the waterproofing, I can’t remember how long it took to paint and dry and paint and.dry (and paint and dry!), but we put down many coats with the tarps stretched out in the yard. Never had an issue with leaking, did have a few instances of melted poles on our more southernly summer travels, so I’d suggest using more of a clear/natural water proofing than the dark coloured stain type.