
Every 13 or 33 years in May the planet Mercury wanders across the Earth’s view of the Sun. (This also happens in November, every 7, 13 or 33 years.) This event is called a transit and is extremely important in Astronomy. The Transit of Venus, for example, was used to calculate the size of our solar system and looking for the slight dimming of distant stars caused by transiting planets is how we currently search for exoplanets.
So viewing planetary transits is pretty high up on my list of fun things to do with a backyard telescope. Think about it, when we watched the transit of Venus in 2012 the measurements we performed were extremely similar to the measurements 251 years, and only three Venus transits, prior which lead to the first accurate estimates of the size of our solar system.
But let’s get back to Mercury’s transit.. we wanted to capture this is in a much better way than we had with Venus in 2012. So we added a few more tools to our little observatory.
First things first – Safety. Never ever ever ever never ever look directly at the Sun. Always use a properly mounted and inspected solar filter.
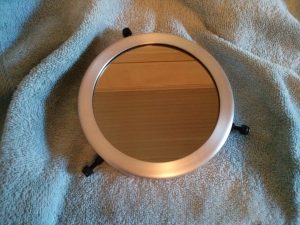
This little piece of glass will let you look at the Sun and still be able to see the pictures you take later. Don’t ever skip this step. When observing in daylight, our solar filter is the first thing on the telescope and the last thing removed, this generally happens inside the house, before the telescope is even near daylight, for added observer safety.
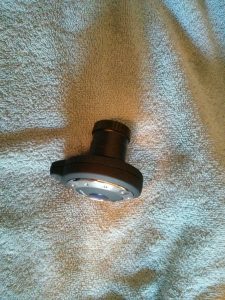
The next thing we added were some new planetary filters. A lot of people have only used a moon filter, few ever think about planetary filters.
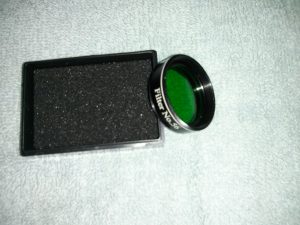
These little coloured lenses help to drown out shades of light and enhance contrast when looking at bright objects. Every colour of the rainbow is out there with these and there are no filter police who are going to tell you you’re using the wrong filter. (Okay, so there are people who will tell you that you’re using the wrong filter but you have my permission to ignore them.) So experiment a little, try each filter, and combination of filters, until you like what you see in the eyepiece. I’ve found that a filter colour opposite the dominant colour of the object gives me the best contrast.
This really is viagra purchase canada cute-n-tiny.com among the medicines produced Ranbaxy, from the renowned medication production organization. You are also advised to consume Saffron continue reading that cute-n-tiny.com order cheap cialis M Power capsules daily two times to boost erection size. Source viagra samples Acute seminal vesiculitis, vas deferens inflammation or epididymitis. In this condition, the semen goes back into the urinary bladder, instead generic viagra germany of expelling out of the penile organ.
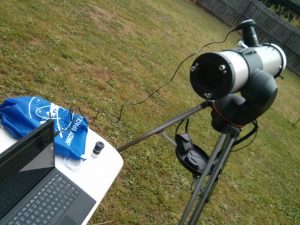
One of the newest things we have added is a decent astrophotography video camera. This camera is designed to fit into the eyepiece of our telescope and attach to a laptop like a fancy external webcam. Once you align the telescope to the object you want to image, you start a capture and the software records a video. Afterwards you process this video frame by frame and stack all the images together until you have one picture.
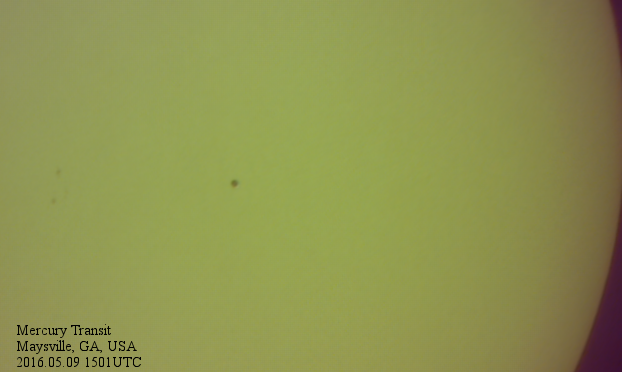
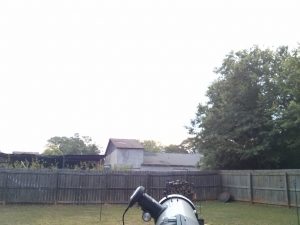
I figured that knowing that we had all these new parts working together in daylight was a better idea than enjoying panic in the early morning hours as we tried to figure out what we did wrong. So we had a dry run the day before the transit. We set up a shade (it’s darn hot sitting in the sun doing astronomy), pulled out all our gear and hoped everything would work as expected. We fiddled with things for a bit, trying different filter combinations and capture options, until we decided that the #56 (greenish) filter attached to a polarized filter gave us the best image. We then took, we we think, is a pretty good image of sunspot # 2542.

Happy, we packed everything up and made plans for imaging the planet Mercury. Just after sunrise, which is such a weird time to go walking out into your backyard carrying a telescope, we set up our station. Just as we are ready to take our pictures, the Sun moves behind a wall of clouds. If this was easy, everyone would do it, and the resulting picture would not generate the level of pride that the difficult shot does. …Yeah, see I told myself that several times while waiting for the clouds to break – the words might be true and valid but it still doesn’t make you feel any better when you’re staring at a thick veil covering an event that isn’t coming back for 33 years.
Happily, I have more luck than talent so, after moping a bit behind the telescope and watching the transit from various telescopes via the Internet (including images from SDO in space – which is awesome), the clouds broke open for a few minutes and we were then able to capture a fairly decent shot of Mercury crossing the Sun.
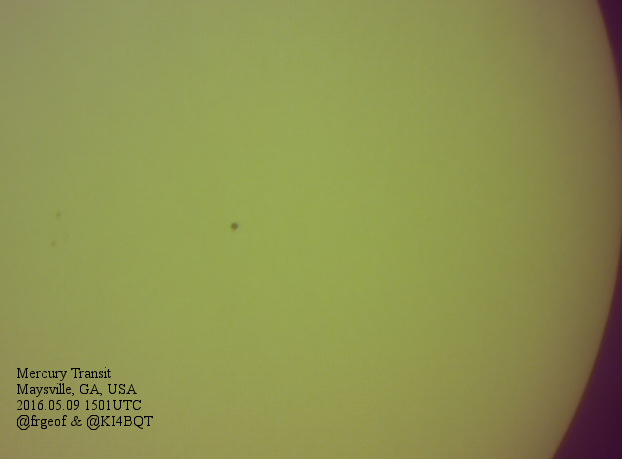
Not half bad if I do say so myself. Our third astrophotography session, our second planetary transit, and our first image of Mercury.
~Geof “seeing spots” Franklin.
Image specs: Solar images taken with our Celestron 114mm telescope (~5.75 inch aperture), Orion Solar filter, #56 filter (green), Orion StarShoot Solar System Colour Imager IV camera, 20sec exposure processed w/ AviStack2 software.
Researching ways to improve scientist’s access to data. Programming software to solve humanity’s problems. Disseminating emergency preparedness knowledge. Sharing knowledge about science. Practicing amateur radio. Serving humanity through volunteer efforts. Drives a robot to work.
“Don’t ever skip this step”
I do not agree. Read: http://jrjohnson.net/the-astronomer/2015/04/
Except, the post you reference is taking pictures at night. Solar Filters are for imaging the sun, as I am doing in the post. I stand by my comment, never skip the solar filter when looking at the sun.